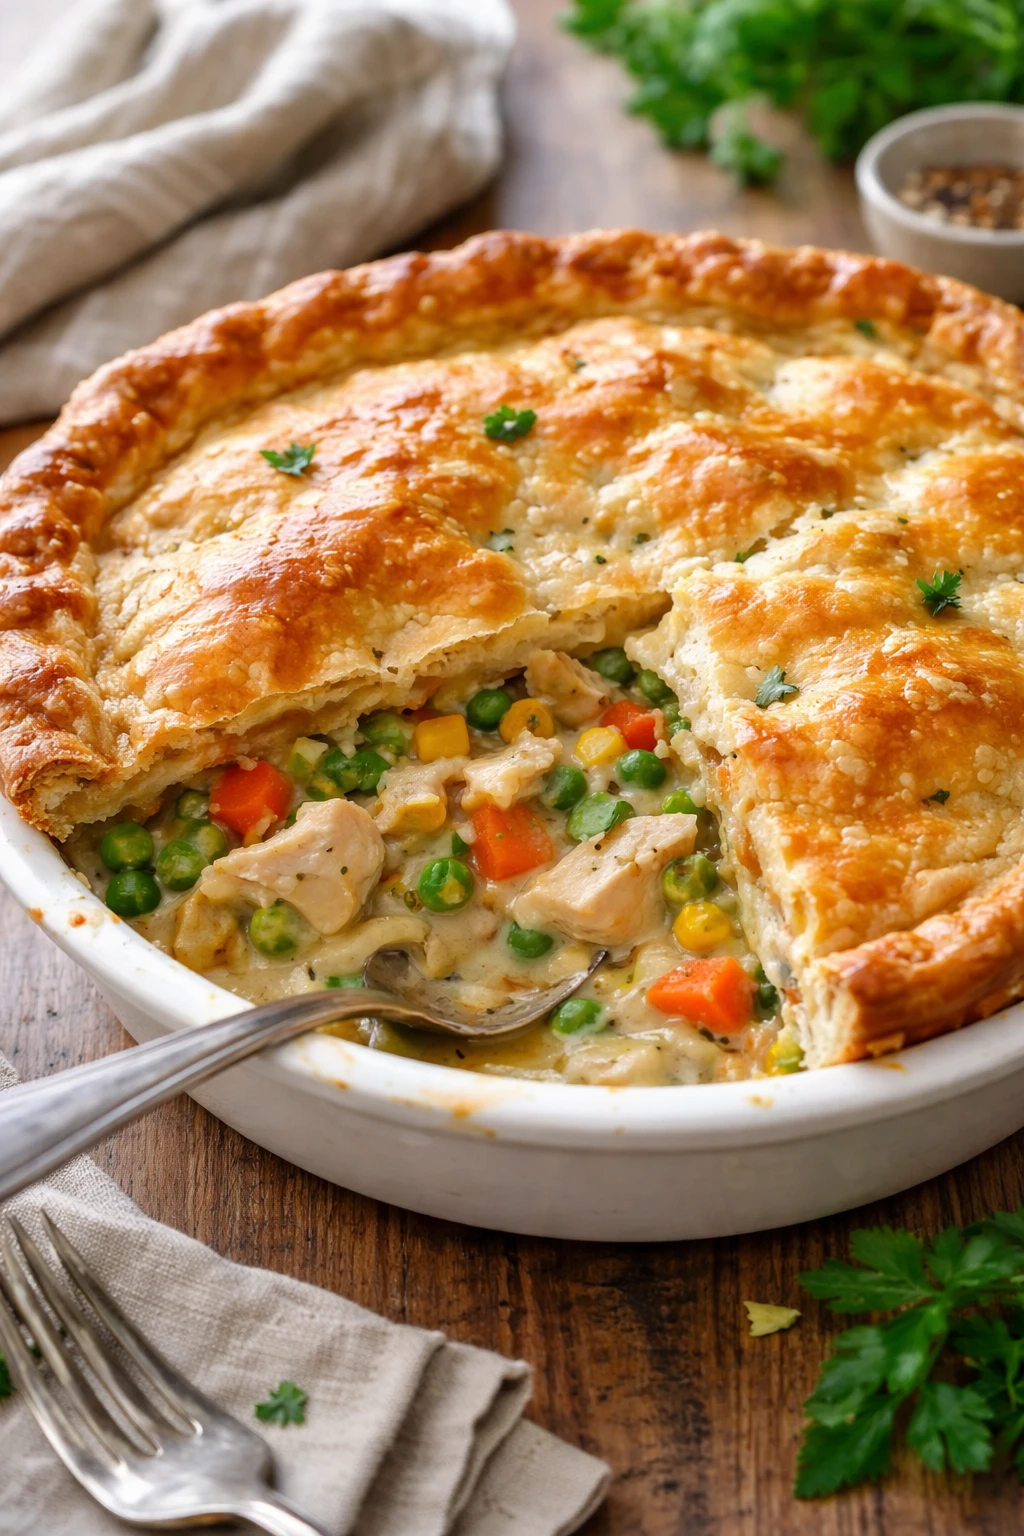
This chicken pot pie is the ultimate comfort food—flaky crust, creamy filling loaded with tender chicken and veggies. I love how the homemade crust makes it extra special. Perfect for cozy dinners on chilly nights!
Introduction
I first made chicken pot pie years ago when I wanted a cozy, homemade meal that reminded me of family dinners growing up. The classic version always felt a little dry or bland to me, so I worked on perfecting the filling to be extra creamy and full of fresh veggies. The trick I learned that really changed the game was making a roux with butter and flour to thicken the sauce before adding the broth and milk. It gives the filling that luscious, velvety texture that just melts in your mouth. Plus, I like to use a mix of fresh carrots, celery, and peas for a nice balance of sweetness and earthiness. The crust is another important part—flaky and buttery, it holds all that goodness together perfectly. When it's done baking, the aroma fills the kitchen and you just know it’s going to be delicious. This pot pie is a bit of work but totally worth it for a comforting dinner that feels like a warm hug on a plate. I hope you enjoy making it as much as I do!
What You'll Need
One 9-inch pie, 6 servings
- 2 cups cooked chicken, shredded
- 1 cup carrots, diced
- 1 cup peas, fresh or frozen
- 1/2 cup celery, diced
- 1/3 cup unsalted butter
- 1/3 cup all-purpose flour
- 1/2 teaspoon salt
- 1/4 teaspoon black pepper
- 1/4 teaspoon dried thyme
- 1 3/4 cups chicken broth
- 2/3 cup whole milk
- 2 prepared pie crusts (store-bought or homemade)
- 1 egg, beaten (for egg wash)
How To Do It
Step 1
Start by prepping your vegetables: dice the carrots and celery into small, even pieces so they cook uniformly. This is important because uneven pieces can lead to some veggies being undercooked while others are mushy. Also, shred your cooked chicken into bite-sized chunks. Having everything prepped before you start the sauce ensures a smooth cooking process and evenly distributed flavors.
⏱ Time: 15
✓ Doneness: Vegetables diced evenly and chicken shredded into uniform pieces
Step 2
In a large saucepan, melt the butter over medium heat. Once melted, whisk in the flour to create a roux. Stir constantly for about 2 minutes until the mixture is golden and bubbly but not browned. This cooking step removes the raw flour taste and thickens the sauce later. Be careful not to let it burn, which would give a bitter flavor.
⏱ Time: 3
✓ Doneness: Roux is smooth, golden, and fragrant without any burnt smell
Step 3
Slowly pour in the chicken broth while whisking to avoid lumps. Then add the milk and continue stirring until the sauce thickens and starts to bubble gently. This gradual addition and constant whisking help create a creamy, lump-free filling. If you rush and add liquids too quickly, the sauce can separate or be grainy.
⏱ Time: 5
✓ Doneness: Sauce thickens to a creamy consistency that coats the back of a spoon
Step 4
Add salt, pepper, and dried thyme to the sauce for seasoning. Then stir in the diced carrots, celery, peas, and shredded chicken. Cook for another 5 minutes on low heat so the vegetables soften slightly but still keep some bite, and the flavors meld. Avoid overcooking here or veggies will turn mushy in the final bake.
⏱ Time: 5
✓ Doneness: Vegetables are tender but not falling apart; sauce is well combined
Step 5
Preheat your oven to 425°F (220°C). Roll out one pie crust into a 9-inch pie dish, pressing it gently into the corners. Pour the chicken and vegetable filling evenly into the crust. This step sets the base for your pie and ensures even cooking. Be sure not to overfill or the filling might bubble over while baking.
⏱ Time: 10
✓ Doneness: Pie crust evenly fitted and filling spread without spilling
Step 6
Cover the filling with the second pie crust. Trim excess dough and pinch the edges to seal. Cut a few small slits in the top crust to allow steam to escape during baking. This prevents the crust from becoming soggy and helps the pie bake evenly. A well-sealed edge also keeps the filling inside.
⏱ Time: 10
✓ Doneness: Top crust sealed with vent slits visible
Step 7
Brush the top crust with beaten egg for a shiny, golden finish. This step adds a beautiful color and a slight crispness to the crust. If you skip this, the crust can look dull and less appetizing.
⏱ Time: 2
✓ Doneness: Crust has an even, glossy egg wash coating
Step 8
Bake the pie in the preheated oven for 30-35 minutes. Keep an eye on it after 25 minutes to avoid burning. The crust should be golden brown and the filling bubbling through the vents. Baking at a high temperature helps set the crust quickly and cooks the filling thoroughly.
⏱ Time: 35
✓ Doneness: Golden-brown crust with bubbling filling visible
Step 9
Let the pie rest for 10-15 minutes after baking before cutting. This resting time allows the filling to thicken and set, so it doesn’t spill out when sliced. It also helps the flavors meld together nicely. Resist the urge to dig in immediately!
⏱ Time: 15
✓ Doneness: Filling thickened and pie slices hold shape cleanly
Pro Tips
Keep your butter and flour mixture moving while making the roux.
Constant stirring prevents the roux from burning and ensures even cooking. If it burns, it will taste bitter and ruin the sauce. The roux’s color and aroma are signs of readiness—golden and nutty, not dark or smoky.
Don’t overcook the vegetables before adding to the filling.
Slightly undercooked veggies retain texture and sweetness after baking. Overcooked vegetables turn mushy and lose their vibrant flavor, making the filling less appealing.
Use an egg wash on the crust for a golden finish.
The egg wash creates a shiny, appetizing crust by promoting browning during baking. Skipping this step results in a dull, pale crust that looks less inviting.
Make sure to cut vents in the top crust.
Vents allow steam to escape, preventing sogginess and bubbling over. Without vents, the crust can get soggy or crack unpredictably.
Let the pie rest before slicing.
Resting helps the filling thicken and set, so slices hold their shape. Cutting too soon causes the filling to spill out and makes serving messy.
Use cold ingredients when making your pie crust.
Cold butter and water prevent premature melting, which helps create flaky layers. Warm ingredients can lead to tough, dense crust.
Preheat your oven fully before baking.
A hot oven ensures the crust sets quickly and browns evenly. Starting in a cold oven can cause greasy, soggy crust.
Common Mistakes to Avoid
Skipping the roux and adding flour directly to liquid.
Why it happens Many think just mixing flour into broth thickens the sauce, but without cooking the flour first, the filling tastes raw and grainy.
Fix Always cook the flour with butter first to create a smooth roux. This step removes the raw flour flavor and thickens the sauce properly.
Overfilling the pie crust.
Why it happens It’s tempting to pack the pie full, but too much filling causes spills and uneven baking.
Fix Fill the crust about 2/3 full to leave room for the top crust and prevent bubbling over.
Not venting the top crust.
Why it happens Forgetting to cut slits means steam builds up, making the crust soggy or cracked.
Fix Cut 3-4 small slits in the top crust before baking to let steam escape.
Using warm butter in the crust dough.
Why it happens Warm butter melts too soon and won’t create flaky layers.
Fix Keep butter cold and handle dough minimally for a tender, flaky crust.
Cutting into the pie immediately after baking.
Why it happens Impatience leads to runny filling spilling out.
Fix Let the pie rest 10-15 minutes to allow filling to thicken and set.
Variations
Vegetarian Pot Pie
Replace chicken with hearty mushrooms and add potatoes or sweet corn. Use vegetable broth instead of chicken broth for a rich, meat-free filling that’s just as comforting.
Note: Cooking time remains similar but ensure mushrooms are sautéed to release moisture before adding to avoid soggy filling.
Cheesy Chicken Pot Pie
Add shredded cheddar or gruyere cheese to the filling for a creamy, cheesy twist. The cheese melts into the sauce, adding richness and a slightly tangy flavor.
Note: Add cheese after the sauce thickens but before adding chicken and veggies to ensure even melting.
Herb-Infused Pot Pie
Boost flavor by adding fresh herbs like rosemary, sage, or parsley to the filling. This adds a fragrant, garden-fresh note that complements the savory chicken.
Note: Add fresh herbs at the end of cooking to preserve their bright flavors.
Gluten-Free Chicken Pot Pie
Use a gluten-free flour blend for the roux and a gluten-free pie crust. This version keeps the creamy filling and flaky crust without gluten, perfect for sensitive diets.
Note: Gluten-free dough can be more delicate; chill well and handle gently to prevent cracking.
Mini Pot Pies
Make individual pot pies using muffin tins or ramekins. Perfect for portion control and fun presentation, great for parties or lunches.
Note: Reduce baking time to 20-25 minutes and watch crust color carefully to avoid burning.
Nutrition
Per Serving:
Nutritional values are estimates and may vary based on specific ingredients used.
Storage & Tips
Room Temperature
Keep the pot pie covered loosely at room temperature for up to 2 hours. Beyond that, bacteria can grow, so refrigerate promptly to ensure safety.
Refrigerator
Store leftovers in an airtight container for up to 4 days. The crust may soften when cold; reheat in the oven to restore crispness or serve cold if preferred.
Freezer
Freeze the fully baked pot pie wrapped tightly in foil and plastic wrap for up to 3 months. Thaw overnight in the refrigerator before reheating to maintain texture.
Reheating
Reheat in a 350°F oven for 20-25 minutes until heated through and crust is crisp. Avoid microwaving as it can make the crust soggy. Add a splash of broth if filling seems dry.
Make Ahead
Prepare the filling and crust separately 1-2 days ahead. Store filling in the refrigerator and keep dough chilled. Assemble and bake on the day you want to serve for the freshest result.
FAQ
Can I use frozen chicken for this recipe?
Yes, but make sure it’s fully thawed and cooked before using. Frozen chicken can release extra water, which may thin the filling. Pat it dry and shred well to avoid excess moisture.
How do I prevent a soggy bottom crust?
Blind bake the bottom crust for 5-7 minutes before adding filling to help it set and stay crisp. Also, avoid overfilling and ensure the filling isn’t too watery.
Can I make this pot pie dairy-free?
Absolutely! Substitute butter with coconut oil or dairy-free margarine, and use a plant-based milk like almond or oat milk. The flavor will be slightly different but still delicious.
What can I do if my filling is too runny?
Simmer it longer to reduce excess liquid or add a bit more flour to thicken the sauce. Make sure to cook the roux properly at the start to prevent runny filling.
Is it okay to use pre-made pie crust?
Yes, store-bought crusts are a great time saver and work well. Just make sure to thaw them properly and handle gently to avoid cracking.
Can I double this recipe and freeze half?
Definitely! Freeze the assembled but unbaked pie wrapped tightly. When ready, bake from frozen, adding extra baking time to ensure it’s cooked through.
How do I make the crust extra flaky?
Use cold butter and minimal handling when making the dough. Chilling the dough before rolling and baking also helps create layers that flake beautifully.
Can I add other vegetables?
Yes! Potatoes, corn, green beans, or mushrooms all work great. Just adjust cooking times slightly and ensure veggies are cut small for even cooking.
Final Thoughts
I hope you give this homemade chicken pot pie a try—it’s truly one of those dishes that feels like a warm, comforting hug. Don’t forget to share how it turns out!