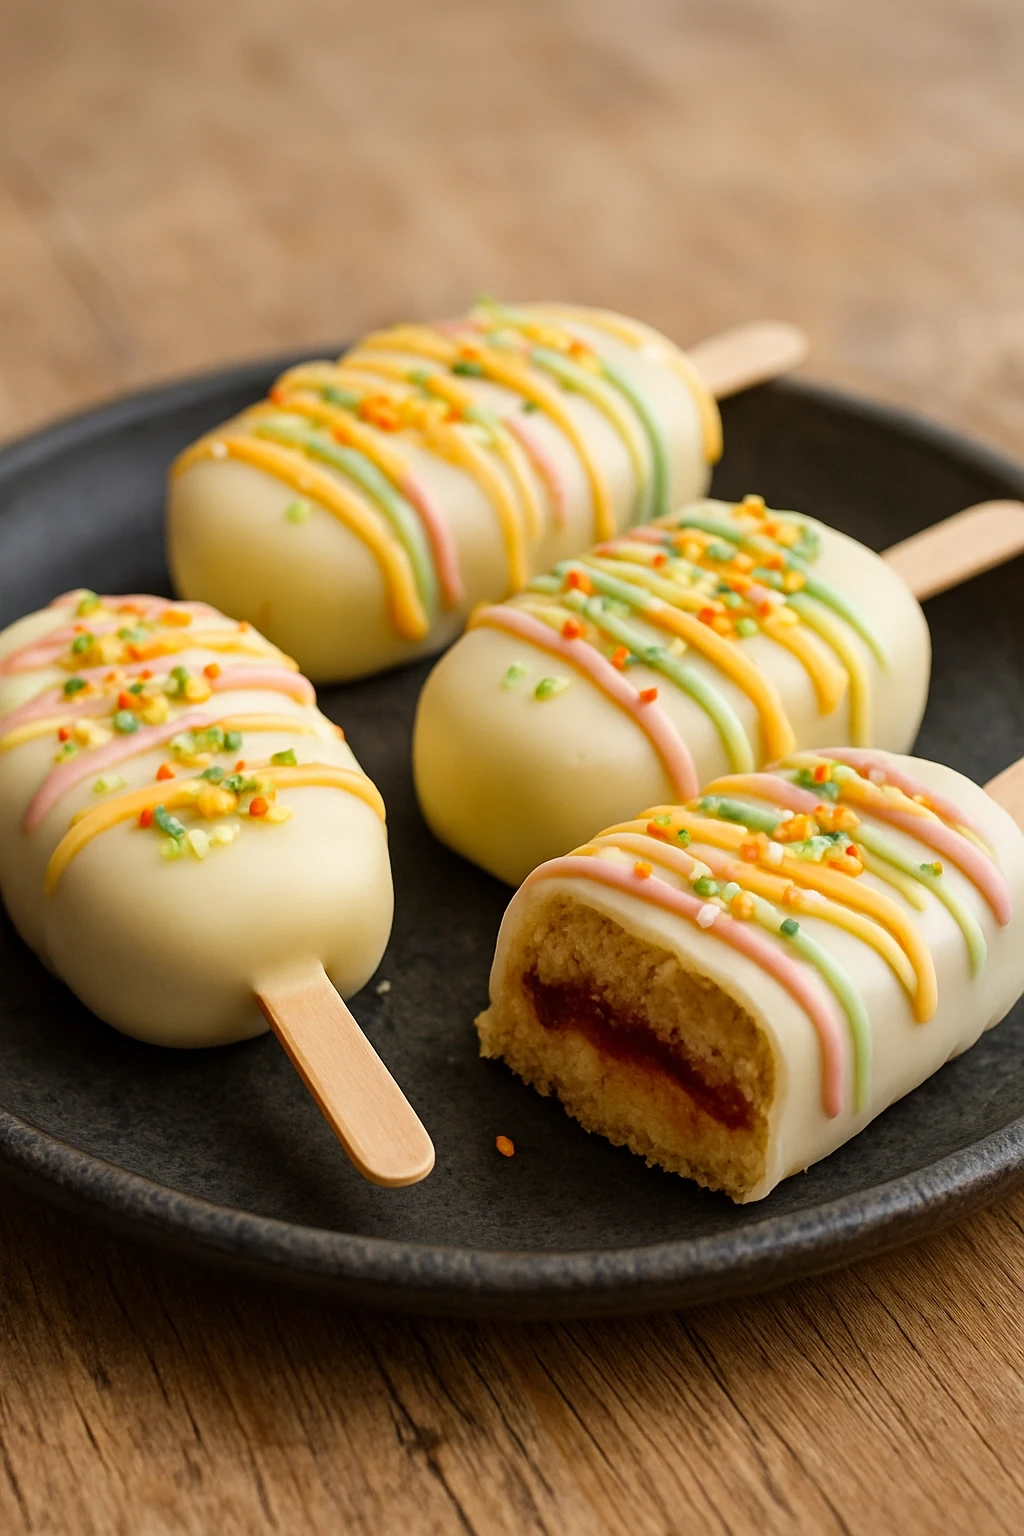
These adorable cakesicles are a fun twist on classic cake pops, with a creamy coating and moist cake center. Using a simple mold makes them perfect for Easter celebrations or any festive gathering.
Introduction
I first made cakesicles a couple of years ago after spotting them on a friend’s Instagram, and honestly, I was hooked immediately. They’re like cake pops but with a sleek, professional look thanks to the molds. What I love most about this recipe is how easy it is to customize — you can swap the cake flavor, add sprinkles, or drizzle chocolate on top for a little flair. One trick I learned is using cream cheese to bind the cake crumbs instead of frosting; it gives a nice tang and keeps the texture just right, not too sweet or mushy. Plus, these are perfect for Easter or any spring gathering because they look so festive and are super fun to eat. The finished cakesicles are moist inside with a crisp chocolate shell outside, making every bite a delightful contrast.
How To Do It
Step 1
Start by crumbling the cooled vanilla cake into fine crumbs. The finer the crumbs, the smoother your cakesicle texture will be. Avoid large chunks because they won’t bind well and can make the final product crumbly. Use your hands or a food processor to get an even consistency. This step is crucial because it sets the base for your cakesicles and ensures they hold together nicely without falling apart.
⏱ Time: 5 minutes
✓ Doneness: Fine, uniform crumbs with no big chunks
Step 2
Mix the crumbled cake with softened cream cheese and vanilla extract. The cream cheese acts as a binder and adds a subtle tang that balances the sweetness. Be careful not to overmix; you want a dough-like consistency that’s moist but firm enough to shape. If it’s too wet, add a bit more cake crumbs; if too dry, a touch more cream cheese. Getting this right is key to easy molding and a perfect texture.
⏱ Time: 5 minutes
✓ Doneness: Dough holds together when pressed but isn’t greasy or sticky
Step 3
Spoon the cake mixture into your cakesicle molds, pressing firmly to fill every corner. This compacting step helps avoid air pockets that can cause cracks when unmolding. Smooth the surface with a spatula or your finger to get a clean finish. Don’t overfill or leave gaps, as that can lead to breakage. If you don’t have molds, you can shape them by hand into balls or ovals, but molds give a neat, professional look.
⏱ Time: 10 minutes
✓ Doneness: Molds are fully filled with smooth, even surface
Step 4
Place the filled molds in the freezer for at least 1 hour. Freezing solidifies the cakesicles, making them easier to coat without falling apart. This step is essential — skipping it can cause your cakesicles to crumble during dipping. Plus, it helps the chocolate shell set quickly and evenly.
⏱ Time: 60 minutes
✓ Doneness: Cakesicles are firm and cold to the touch
Step 5
Melt the white chocolate gently in a double boiler or microwave in short bursts, stirring often to avoid burning. The chocolate should be smooth and fluid for dipping. If it’s too thick, thin with a teaspoon of vegetable oil or shortening. Properly melted chocolate coats evenly and hardens with a nice snap.
⏱ Time: 5 minutes
✓ Doneness: Smooth, glossy melted chocolate with no lumps
Step 6
Carefully unmold the frozen cakesicles and dip each into the melted chocolate, using a spoon to cover fully if needed. Tap off excess chocolate gently to avoid drips. Work quickly but gently — the frozen cakesicles help the chocolate set fast. If you want, add sprinkles or decorations immediately before the chocolate hardens for a festive touch.
⏱ Time: 10 minutes
✓ Doneness: Even chocolate coating with no holes or thin spots
Step 7
Place the coated cakesicles on parchment paper and let them set at room temperature or in the fridge until the chocolate shell is completely hardened. Avoid stacking or touching them while setting to keep the shell smooth and shiny. Once set, they’re ready to serve or package for gifting.
⏱ Time: 20 minutes
✓ Doneness: Chocolate shell is firm, shiny, and snaps when gently pressed
Pro Tips
Don’t skip freezing the cakesicles before dipping.
Freezing firms up the cake mixture, preventing it from falling apart when dipped in warm chocolate. It also helps the chocolate shell set quickly, giving a crisp texture contrast that’s so satisfying.
Use a toothpick or skewer to dip cakesicles for better control.
This allows you to submerge the cakesicle fully without breaking it and helps tap off excess chocolate evenly. It also keeps your fingers clean and avoids melting the cake from hand warmth.
Add a teaspoon of vegetable oil to melted chocolate if it’s too thick.
Thinning the chocolate improves coating smoothness and prevents thick, clumpy shells. It also helps the chocolate set with a glossy finish and a pleasant snap.
Press the cake crumbs firmly into the molds.
Compact cake mixture ensures there are no air pockets that cause cracks or holes after dipping. It also gives a smooth surface for the chocolate shell to adhere to.
Decorate immediately after dipping while chocolate is still wet.
Sprinkles or edible decorations stick better and won’t fall off once the shell hardens. Waiting too long means they won’t adhere properly.
Common Mistakes to Avoid
Using warm cake crumbs or cold cream cheese.
Why it happens Sometimes people forget to fully cool the cake or soften the cream cheese, leading to a mixture that’s too wet or lumpy.
Fix Always use completely cooled cake and room temperature cream cheese to achieve the right dough consistency. This prevents melting or clumping.
Skipping the freezing step before dipping.
Why it happens Impatience or lack of planning can cause skipping freezing, but it’s essential for structural integrity.
Fix Freeze cakesicles for at least an hour to firm up. This prevents them from falling apart in warm chocolate and helps the shell set quickly.
Overmixing the cake and cream cheese.
Why it happens Trying to get a perfectly smooth mixture can lead to overworking, which breaks down cake texture too much.
Fix Mix just until combined. Overmixing makes the mixture gummy and dense instead of tender and light.
Using low-quality or overheated chocolate.
Why it happens Cheap chocolate or overheating can cause grainy texture or seizing.
Fix Use good-quality white chocolate and melt gently in short bursts, stirring often to keep smooth and fluid.
Variations
Chocolate Fudge Cakesicles
Swap the vanilla cake for chocolate cake and use dark chocolate for coating. Add a pinch of espresso powder to intensify the chocolate flavor. These are richer and perfect for chocoholics.
Note: Chocolate cake crumbs may require slightly more cream cheese for binding due to their denser texture.
Lemon Raspberry Cakesicles
Add lemon zest to the cake-cream cheese mixture and sprinkle freeze-dried raspberries on top of the white chocolate coating. This gives a fresh, tangy twist that’s bright and spring-appropriate.
Note: Be gentle with freeze-dried raspberries as they can absorb moisture and lose crunch if added too early.
Peanut Butter & Chocolate Cakesicles
Mix peanut butter into the cream cheese before combining with cake crumbs, then dip in milk chocolate. It’s a nostalgic flavor combo that’s always a crowd-pleaser.
Note: Peanut butter adds fat so reduce cream cheese slightly to keep the right texture.
Vegan Cakesicles
Use vegan cake crumbs and substitute cream cheese with coconut cream or vegan cream cheese. Use dairy-free chocolate for coating. These are just as tasty and suitable for plant-based diets.
Note: Coconut cream binding may require chilling longer to firm up before dipping.
Nutrition
Per Serving:
Nutritional values are estimates and may vary based on specific ingredients used.
Storage & Tips
Room Temperature
Cakesicles can be kept at room temperature for up to 4 hours if covered to prevent drying out. Avoid humid or warm spots to keep the chocolate shell crisp.
Refrigerator
Store cakesicles in an airtight container in the fridge for up to 5 days. The chocolate shell may lose some shine but will stay firm. Serve cold or bring to room temperature before eating for best flavor.
Freezer
Freeze cakesicles in a single layer wrapped tightly in plastic and placed in a freezer bag for up to 2 months. Thaw overnight in the fridge to prevent condensation, which can dull the chocolate shell.
Reheating
No reheating needed. If desired, bring to room temperature for 30 minutes before serving to soften the cake center slightly. Avoid microwaving as it can melt the chocolate shell unevenly.
Make Ahead
Prepare the cake mixture and fill molds 1-2 days ahead, freeze solid, then dip in chocolate on the day of serving. This keeps the process manageable and ensures fresh, crisp coating.
FAQ
Can I use store-bought cake for this recipe?
Absolutely! Store-bought cake works fine as long as it’s moist and fresh. Avoid dry or dense cakes since they won’t bind well with the cream cheese. Crumble the cake finely for the best texture.
What if my cakesicles crumble when I dip them in chocolate?
This usually means the cake mixture isn’t firm enough or wasn’t frozen long enough. Make sure to chill the filled molds for at least an hour until solid. Also, avoid warm cake crumbs or too much cream cheese.
Can I use chocolate chips instead of white chocolate bars?
Yes, but choose high-quality chips that melt smoothly. Sometimes chips contain stabilizers that can make melting tricky. Melt gently and add a little oil if needed to get a smooth coating.
How do I store leftover cakesicles?
Keep them in an airtight container in the fridge for up to 5 days. They’re best eaten cold or at room temperature. Freezing is also an option for longer storage.
Can I make these gluten-free?
Definitely! Use a gluten-free cake mix or homemade gluten-free cake crumbs. The rest of the recipe stays the same. Just check your chocolate is gluten-free too.
Final Thoughts
I hope you give these cakesicles a try—they’re such a fun, crowd-pleasing treat! Let me know how yours turn out and if you try any fun flavor twists.